
It's about time, huh? I've fooled around and put off programming the PIC MCU processor on this DRO for a few days now; I figured I'd run into some problems with this part of it because I had installed a generic second LPT/printer port PCIA card on this PC some time ago in an attempt to increase the capabilities of the Mach3 CNC software that I'm still not using (but I have a licensed copy!), but that caused the dreaded "blue screen of death" each time I rebooted or started this PC due to conflicting LPT port addresses. Yes, I have FINALLY learned my lesson: if it's worth buying, it's worth buying a quality version! Well, I try to stick to that, but the scales I bought for my Taig were Chinese digital versions... :(
I had an issue with the 8" vertical scale I bought new from an ebay seller-the LCD didn't display the digit in the "ones" place in inches (which would have been the "tens" digit in metric/mm mode) correctly, but I believe the problem to be either in the LCD itself, the LCD driver IC, or a connection between the two. If this is the case, I should be able to use it with this DRO because the display on the scale will be out of sight and not needed. The seller owed me a bit of a refund on the shipping charges, but I'd rather just keep the scale for use on another tool-possibly with another Shumatech DRO. One day I'll have top quality 1 micron (0.00005") glass scales on my favorite manual mill and hopefully on my favorite manual lathe, too, or at least 5 micron (0.0002") glass scales on the lathe and DRO Pros displays on both of those but I'll keep the Shumatech unit(s) for other manual machine tools. The DROs won't be needed on the CNC machines I'll eventually have, which I pray won't be too long from now; I have too many ideas and sincerely believe that I can live a much better life manufacturing multiple versions of those with the assistance of the computer-controlled equipment.
I'm full of hopes and dreams-still, at the age of 30 (even though I had always been sure I'd already have my own shop and would have accomplished more over the course of my life by now), but this IS my calling. No, not just the machine tools/mills/lathes/etc., but electro-mechanical creations to be more specific. My intended major when I started back to school was Pre-Engineering, and the course that seemed to attract me more was the electrical field-even though I've always been more mechanically inclined and had worked for years in steel yards, fab shops, and other jobs where I had built countless creations from metal. Electronics wasn't a hard concept for me to grasp, but there are still more things I don't know about it then I do (or think I do, anyway). I'm no expert in anything, but I always seem to find my way around nearly anything I encounter with relative ease.
OK, OK, OK-enough bragging, boasting, and rambling, here's some more pics:

One of my PIC programmers, this one is an outdated (nearly "ancient" now) parallel port programmer from MicroEngineeringLabs (meLabs), their "EPIC" model.

The 8-40 pin adapter with ZIF socket I use for programming PIC MCUs; the frictionless insertion and removal from the big black ZIF socket makes straightening bent pins and unnecessary strain on the processors caused by removing them from a standard or machine-pin socket obsolete. I have several other programmers, including a nice MikroElektronika Easy-PIC5 complete prototyping board with USB programmer, a Microchip PICKIT 2, and several JDM-style generic programmers-even one I built myself, but this one with the ZIF socket adapter has been my favorite for a long time now.

The DRO-350's PCB on my keyboard shelf beside the EPIC programmer, ZIF socket adapter, "straight-through" male-to-female DB-25 cable required for using the programmer, and two 9-volt batteries I had to use because I had misplaced the 16V AC adapter I had for the programmer. One was fresh and registered over 9.65VDC on my Fluke but the other had been in service in my "Screamin' Meanie" alarm clock for a few months and was nearly at the end of it's life, putting out only 8.4VDC.

Here's some pics of me going through the initial set-up for the DRO-this is the direction option where you can compensate for mounting the scales backwards, upside-down, or whatever. I kept them all set to forward currently because I don't have any scales mounted yet, even though at least two of them will most likely be mounted with the LCD displays facing the wrong way to facilitate easier mounting on my Taig. These settings will be adjusted again as needed after they're mounted.

CPI (count per inch) setting-I left these to the default 20,480 for use with the Chinese caliper-style scales. These can be adjusted for use with optical/glass encoders, but it's really pointless to use them with the '350 unless you have the DPU-550 daughterboard to take advantage of the increased resolution.

Intensity settings of the 7-segment LED displays-five choices here, 1-5, and though I've snapped pics of each setting, the intensity of the light is better observed in person. "5" represents 100% (which can actually be "overdriven" a bit by substituting a lower value than the 150 Ohms resistor packs/networks listed on the BOM for R12, R13, and R14-DO NOT GO LOWER THAN 68 OHMS IF YOU ATTEMPT THIS MODIFICATION-this would allow more current to pass through the drivers than they can handle, and you'd also need to use an AC adapter or power supply with more current than 1200mA recommended with this kit; ensuring the Watchdog Timer is enabled when programming the PIC is also a must to provide protection for it if the program were to lock up. The "5" setting with the 150 Ohm packs is really bright enough for almost anybody, but if you're building this kit and want more info on this mod, check out the "modifications" page on the Shumatech website), "4" = 80%, "3" = 60%, "2" = 40%, & "1" = 20%. You can tell a bit of a difference in the pics, but it's much more dramatic in person...


And another pic of the "5" setting (100%) for direct comparison to the "1" (20%) setting:

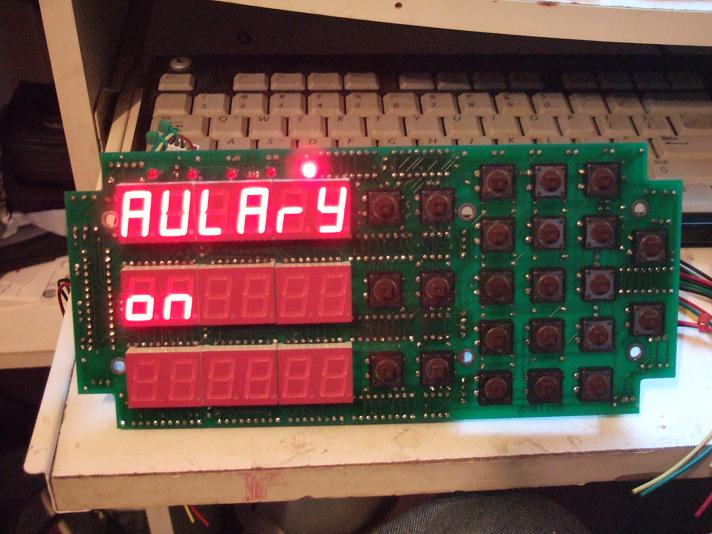
Auxillary setting-can be used for either a tachometer or an electronic edge finder either directly or optically coupled to the DRO. I turned this feature on because I have a Sherline tach (EO) sensor that I plan to mount close to the spindle pulley with approximately 180-degrees "blacked-out" and the remaining portion polished (in front of the sensor, anyway). This DRO requires only a single 5VDC pulse per revolution where the Sherline tach uses 6ppr. I also have the Sherline black and white pulley sticker, but my spindle speed display would read six times higher on this DRO if I were to use it unmodified. I'd rather not have to divide the reading by six or build a PIC-controlled interface to divide the pulses sent to the '350, so I'll just use some black electrical tape and polishing compound on the rest of the pulley after I build an enclosure for the sensor and mount it securely...

Aux. setting changed back to "off" because I don't have the sensor installed and ready yet. The tach display actually toggles between the Z axis display when it's selected (it can be turned on in this setting and just toggled to check speed when needed and reverted back to displaying the position of the Z axis with the push of a couple buttons, but I'll have to go back through the settings again when I install the scales so I'll change it back at that time). The DRO-550 (which isn't currently available because the Atmel processors it uses are backordered for some time still) has many more features than this '350 and also has a separate 2-axis LCD add-on available for a fourth axis, spindle speed display, or another option if wanted or needed, so I'll probably upgrade to that when they're available again and move this display to my mini-lathe.

Auto-off setting: this can be off or set to 15, 30, or 60 minutes, like I chose here. The manual says that it will turn off when no buttons on the DRO are pressed for the selected amount of time, so I may change this down the road if I find I'm not taking advantage of the tool radius offsets, bolt pattern possibilities, preset positions, incremental coordinates, etc. while using the Taig or if extended milling operations allow it to automatically shut off before I want it to.
There are more mods that I'd like to perform to this and mounting the scales will be a job itself, but I've found the perfect aluminum angle at school that I'm planning to use as both scale mounts and protectors-similar to what this guy has done to his Taig here: Some REALLY cool Taig and Rong-Fu mods! I'll cover that stuff later though, I've got some work to do right now.
More to come SOON...
No comments:
Post a Comment